
This re-sizable window by default shows the trajectory of the launched arrow. It is not particularly useful for target shooters, however for 3D shooters, flight shooters and for hunters, it is likely to be helpful in understanding wind effects and target height changes. While quite accurate, the plots are intended to provide an indication of what is happening, so are presented without forensic detail.
A similar plot is to be found within the calculator's Ballistics>External panel where a summary of the flight can also be seen. This area also allows other plots to be added - particularly those associated with arrow rotation or fishtailing.
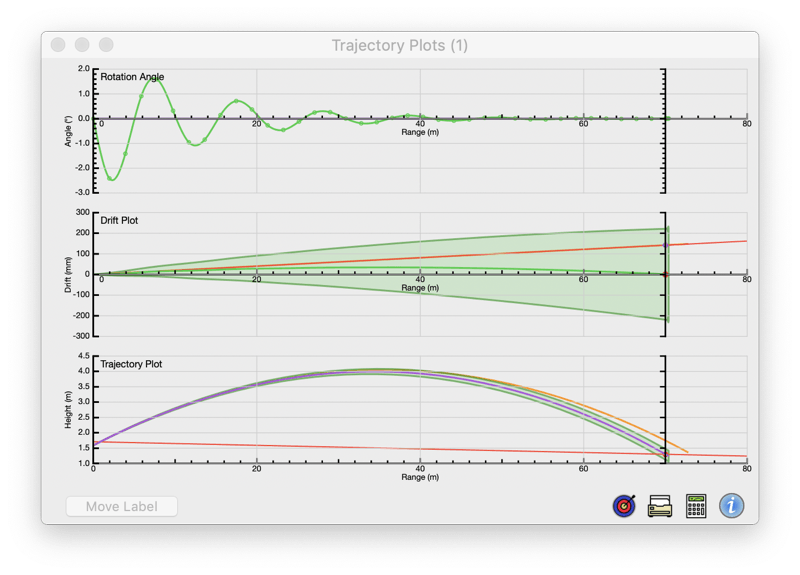
This is a traditional height vs range plot that terminates when the arrow reaches the requested range. The purple trace is the arrow's ballistic trajectory. For comparison purposes, the trajectory of a perfect (zero drag) arrow is also shown in light purple, terminating at the same time as the real arrow trajectory.
There are two vertical axis that represent height above ground. On the left is the archer and on the right is the target. The left axis is labelled with the net height of the axis. The ticks are at sensible intervals in the height units.
The horizontal axis represent the target range and is placed at ground level at the archer's feet. This axis may be offset in the Ballistics>External panel's "Axis" field.
The scaling of the range and height axis is usually different unless the "Trajectory Axis Scales Equal" checkbox is checked in the Preferences window. The plot is auto scaled to include the target and the maximum excursions of both the real and zero drag arrows. Manual scaling is not possible.
A target with the current face size drawn to scale is placed on the target axis. This may be too small to be seen in some conditions, and will appear flattened if the scaling on the two axis is different, however it helps in getting a feel for the scaling.
The red sight-line is a straight line from the archer's eye and passing through the target center. It is usually extended beyond the target. The bow's sight pin and peep would be on this line if the archer is properly sighted on the target.
If the trajectory passes within the target tolerance zone (see Ballistics>Extras), then the plot continues until this zone is exited, otherwise the plot terminates when the range is achieved.
If the zero-drag trajectory is shown, then it will terminate at the same flight time as the real trajectory, hence the zero-drag line usually extends beyond the target.
When the arrow fails to reach the target range due to an over range or a strong head wind, its trajectory will be shown until it has fallen approximately 100 m below the target.
The Status Bar is the strip along the bottom of the window containing various buttons and data fields. When the window is reduced in width, the data fields are progressively hidden.

This button is most likely how your reached this page. It has a toggling action so pressing it again will hide this window. The popup window can be detached by dragging the border area.
Selects the calculator's Ballistics>External panel from where plots options may be selected. If the panel is already visible, then the calculator will be hidden. A second press will make the calculator visible again with a toggling action.
Prints the current view of the Trajectory window. Can be useful for recording some plots for future reference, remembering that it can be saved to a PDF file.
Re-sights the launching so the group will be centered on the target. This compensates for range, target height and wind changes and can be done automatically for changes beyond a threshold set in the Preferences window. (Option clicking the button will re-sight the vertical and simply zero the azimuth).
Disabled in this window.